Machine Vision
OpenCV Watershed Marker Definition Techniques
Learn how to use OpenCV's powerful image processing tools to define markers for watershed segmentation and effectively separate objects in your images.
Learn how to use OpenCV's powerful image processing tools to define markers for watershed segmentation and effectively separate objects in your images.

The Watershed algorithm, implemented in OpenCV, provides a powerful approach to image segmentation by simulating a topographic map and rainfall. This analogy helps understand how the algorithm identifies objects within an image.
The Watershed algorithm in OpenCV segments images like a topographic map. Imagine rain falling on the map; water flows downhill, forming basins around peaks (objects). Here's how to use it:
Preprocess your image: This might involve converting to grayscale, blurring, or thresholding to highlight object edges.
import cv2
img = cv2.imread('image.jpg')
gray = cv2.cvtColor(img, cv2.COLOR_BGR2GRAY)
ret, thresh = cv2.threshold(gray,0,255,cv2.THRESH_BINARY_INV+cv2.THRESH_OTSU)
Create markers: These are labels on your image. You need at least:
# Example: Assuming you have a way to find object centers
markers = np.zeros_like(gray)
markers[object_center_y, object_center_x] = 255  # Object marker
markers = cv2.watershed(img, markers)
Apply the watershed: The algorithm floods from the markers, assigning pixels to basins. Boundaries between basins become your segmentation lines.
cv2.watershed(img, markers)Interpret the results: markers will now contain labels for each segmented region. You can use these to visualize or further process the segmented objects.
# Example: Visualize segmentation
img[markers == -1] = [255, 0, 0]  # Draw boundaries in blue
cv2.imshow("Segmented", img)
cv2.waitKey(0)
Key points:
This Python code uses OpenCV to segment an image of coins. It converts the image to grayscale, applies thresholding, and removes noise. It then identifies sure background and foreground areas using dilation and distance transform. The unknown region is marked, and markers are created for watershed segmentation. The watershed algorithm is applied, and the segmented image with boundaries highlighted in blue is displayed.
import cv2
import numpy as np

# Load the image
img = cv2.imread('coins.jpg')

# Preprocessing
gray = cv2.cvtColor(img, cv2.COLOR_BGR2GRAY)
ret, thresh = cv2.threshold(gray, 0, 255, cv2.THRESH_BINARY_INV + cv2.THRESH_OTSU)

# Noise removal (optional but recommended)
kernel = np.ones((3, 3), np.uint8)
opening = cv2.morphologyEx(thresh, cv2.MORPH_OPEN, kernel, iterations=2)

# Sure background area
sure_bg = cv2.dilate(opening, kernel, iterations=3)

# Finding sure foreground area
dist_transform = cv2.distanceTransform(opening, cv2.DIST_L2, 5)
ret, sure_fg = cv2.threshold(dist_transform, 0.7 * dist_transform.max(), 255, 0)

# Finding unknown region
sure_fg = np.uint8(sure_fg)
unknown = cv2.subtract(sure_bg, sure_fg)

# Marker labeling
ret, markers = cv2.connectedComponents(sure_fg)

# Add one to all labels so that sure background is not 0, but 1
markers = markers + 1

# Now, mark the region of unknown with zero
markers[unknown == 255] = 0

# Apply Watershed algorithm
markers = cv2.watershed(img, markers)

# Visualize segmentation
img[markers == -1] = [255, 0, 0]  # Draw boundaries in blue
cv2.imshow("Segmented", img)
cv2.waitKey(0)
cv2.destroyAllWindows()
Explanation:
Image Loading and Preprocessing:
coins.jpg.Noise Removal:
Identifying Sure Background and Foreground:
Unknown Region:
Marker Creation:
Watershed Algorithm:
cv2.watershed function using the original image and the created markers.Visualization:
Key improvements in this example:
This example demonstrates a more complete and robust approach to using the Watershed algorithm for image segmentation in OpenCV. Remember to adapt the preprocessing steps and parameters based on your specific image and segmentation goals.
Marker Strategies:
Parameter Tuning:
Advantages of Watershed:
Limitations:
Applications:
Tips:
The Watershed algorithm in OpenCV segments images by treating them like topographic maps. Here's a breakdown:
1. Image Preprocessing:
2. Marker Creation:
3. Watershed Application:
4. Result Interpretation:
Key Considerations:
The Watershed algorithm offers a unique approach to image segmentation in OpenCV, effectively separating objects by simulating water flow on a topographic map. While powerful, its success hinges on accurate marker definition. Techniques like thresholding, morphology operations, and distance transforms can automate this process, making it more robust. Despite its sensitivity to noise and potential for over-segmentation, the Watershed algorithm's ability to handle complex shapes and adapt to local image features makes it a valuable tool for various applications, from object recognition to medical image analysis. Understanding its strengths, limitations, and the importance of parameter tuning is crucial for achieving optimal segmentation results.
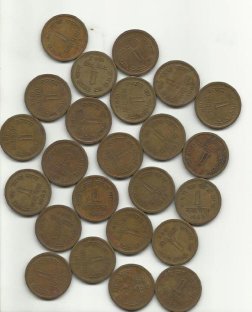 Image Segmentation with Watershed Algorithm - OpenCV | So OpenCV implemented a marker-based watershed algorithm where you specify which are all valley points are to be merged and which are not. ... The boundary region ...
 c++ - watershed segmentation opencv xcode - Stack Overflow | Jul 11, 2012 ... convertTo(markers, CV_32S); watershed(image,markers); markers.convertTo ... How to define the markers for Watershed in OpenCV? 13 · Image ...
 Static labels in watershed - imgproc - OpenCV | Note: I incorrectly identified my problem; cf Static labels in watershed - #4 by Arcanis I’m trying to apply the watershed algorithm, but I have a slight hiccup. From my understanding, I need to give the background a non-zero value in order to prevent the algorithm to try to fill it. That makes sense, however it means that the background slightly bleeds inside the objects themselves (trying to fill the unknown part). Assuming I know for a fact that the background is exactly where it is and now...
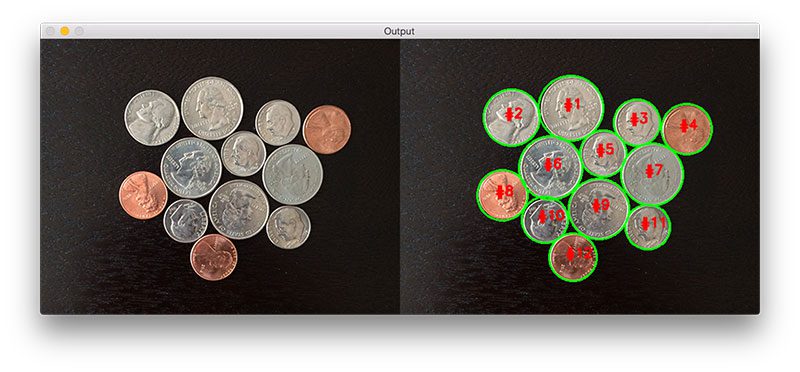 Watershed OpenCV - PyImageSearch | In this tutorial I'll show you how to use the Watershed algorithm to segment touching or overlapping objects using OpenCV, scikit-image, SciPy, and Python.
![Difference between FloodFill and Watershed [closed] - OpenCV ...](/placeholder.png) Difference between FloodFill and Watershed [closed] - OpenCV ... | Aug 17, 2018 ... What is the difference between OpenCV's functions floodFill() and watershed? I seem to understand that watershed takes some markers and ...
Difference between FloodFill and Watershed [closed] - OpenCV ... | Aug 17, 2018 ... What is the difference between OpenCV's functions floodFill() and watershed? I seem to understand that watershed takes some markers and ... Image Segmentation with Watershed Algorithm - OpenCV Python ... | A Computer Science portal for geeks. It contains well written, well thought and well explained computer science and programming articles, quizzes and practice/competitive programming/company interview Questions.
 image processing - Prevent background segmentation in watershed ... | Apr 3, 2019 ... In the question it is asked how to define markers for Watershed in OpenCV. ... This is my marker for watershed transform. 6- I applied the ...
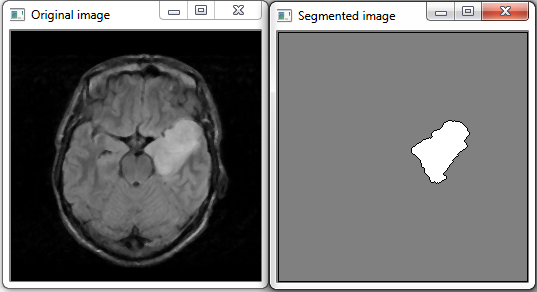 Watershed c++ source sode - OpenCV Q&A Forum | May 7, 2013 ... watershed(InputArray image, InputOutputArray markers);. image ... because of how the watershed implementation of openCV is defined probably. #007 OpenCV projects – Image segmentation with Watershed ... | Dec 1, 2020 ... So, we can conclude that the goal of this algorithm is to identify watershed lines. ... The next step is to label markers for the watershed ...