In image processing, isolating specific colors within an image is a common task. This article provides a step-by-step guide on how to detect and extract a specific color from an image using Python and OpenCV. We'll leverage the HSV color space for more accurate color detection and utilize masking techniques to isolate the desired color.
-
Understand HSV color space: HSV (Hue, Saturation, Value) represents colors differently than RGB. Hue is the color type (0-360 degrees), Saturation is the color intensity (0-100%), and Value is the brightness (0-100%).
-
Convert image to HSV:
hsv_image = cv2.cvtColor(image, cv2.COLOR_BGR2HSV)
-
Define target color range: Determine the lower and upper bounds of your target color in HSV. You can use a color picker tool or online resources to find these values. For example, for red:
lower_red = np.array([0, 100, 100])
upper_red = np.array([10, 255, 255])
-
Create a mask: Use cv2.inRange to create a mask containing only the pixels within the defined color range:
mask = cv2.inRange(hsv_image, lower_red, upper_red)
-
Fine-tune the range: If the mask doesn't accurately isolate your target color, adjust the lower and upper HSV boundaries. Increase the range to include more variations of the color, or decrease it for higher precision.
-
Apply the mask: Use the mask to isolate the target color in the original image:
result = cv2.bitwise_and(image, image, mask=mask)
-
Handle colors at the edge of the hue spectrum: Colors like red wrap around the hue circle. To detect red accurately, you may need two ranges:
lower_red1 = np.array([0, 100, 100])
upper_red1 = np.array([10, 255, 255])
lower_red2 = np.array([170, 100, 100])
upper_red2 = np.array([180, 255, 255])
mask1 = cv2.inRange(hsv_image, lower_red1, upper_red1)
mask2 = cv2.inRange(hsv_image, lower_red2, upper_red2)
mask = cv2.bitwise_or(mask1, mask2)
This Python code uses OpenCV to detect and segment red regions in an image. It loads an image, converts it to HSV color space, defines HSV ranges for red, creates masks for those ranges, combines them, applies the combined mask to the original image to extract red regions, and finally displays the original image, mask, and the segmented result.
import cv2
import numpy as np

# Load the image
image = cv2.imread('your_image.jpg')

# Convert the image to HSV color space
hsv_image = cv2.cvtColor(image, cv2.COLOR_BGR2HSV)

# Define the lower and upper bounds of the target color (red in this case)
lower_red1 = np.array([0, 100, 100])
upper_red1 = np.array([10, 255, 255])
lower_red2 = np.array([170, 100, 100])
upper_red2 = np.array([180, 255, 255])

# Create masks for both ranges of red
mask1 = cv2.inRange(hsv_image, lower_red1, upper_red1)
mask2 = cv2.inRange(hsv_image, lower_red2, upper_red2)

# Combine the masks to get all shades of red
mask = cv2.bitwise_or(mask1, mask2)

# Apply the mask to the original image
result = cv2.bitwise_and(image, image, mask=mask)

# Display the original image, mask, and result
cv2.imshow('Original Image', image)
cv2.imshow('Mask', mask)
cv2.imshow('Result', result)

# Wait for a key press and then close the windows
cv2.waitKey(0)
cv2.destroyAllWindows()
Explanation:
-
Import Libraries: Import
cv2 for image processing and numpy for array operations.
-
Load Image: Load the image using
cv2.imread().
-
Convert to HSV: Convert the image from BGR (default OpenCV format) to HSV using
cv2.cvtColor().
-
Define Color Range: Define the lower and upper bounds for the target color (red) in HSV. Since red wraps around the hue spectrum, we define two ranges.
-
Create Masks: Create two masks using
cv2.inRange() to detect pixels within the defined red ranges.
-
Combine Masks: Combine the two masks using
cv2.bitwise_or() to get a single mask containing all shades of red.
-
Apply Mask: Use
cv2.bitwise_and() with the combined mask to extract only the red regions from the original image.
-
Display Results: Display the original image, the combined mask, and the final result using
cv2.imshow().
-
Wait and Close: Wait for a key press using
cv2.waitKey(0) and then close all windows using cv2.destroyAllWindows().
Remember to:
- Replace
'your_image.jpg' with the actual path to your image file.
- Adjust the HSV ranges for the target color based on your specific image and desired outcome. You can use a color picker tool to determine the appropriate values.
- Experiment with different color ranges and combinations to achieve the desired segmentation results.
HSV Color Space:
-
Advantages over RGB for color detection: HSV separates color information (hue) from luminance (value), making it more robust to lighting variations. This makes it easier to define color ranges that work consistently across different lighting conditions.
-
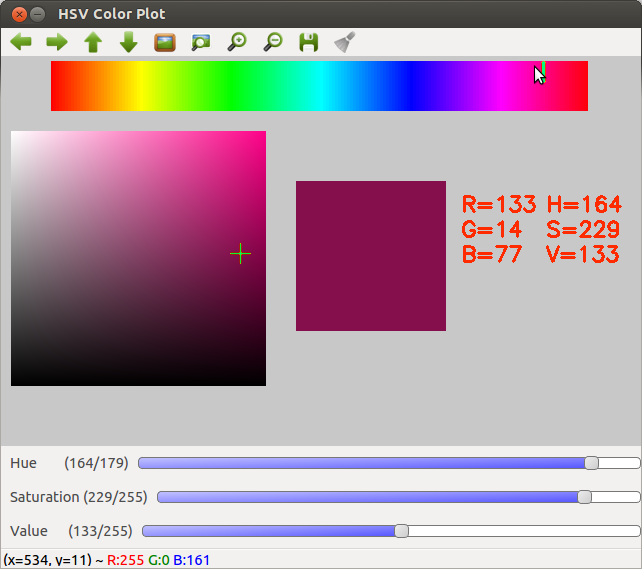
Visualizing HSV: Use tools like color pickers or online HSV visualizers to understand how hue, saturation, and value interact to create different colors. This will help you define appropriate ranges for your target color.
Code Implementation:
-
Image Types: Ensure your input image is loaded correctly using
cv2.imread(). If it's not a color image, the conversion to HSV won't work as expected.
-
Data Types: Use
np.array with appropriate data types (usually uint8 for HSV values) when defining the lower and upper bounds for color ranges.
-
Efficiency: For multiple color detections, consider converting the image to HSV only once at the beginning.
Fine-tuning and Optimization:
-
Trial and Error: Finding the perfect HSV range often involves trial and error. Start with a wide range and gradually narrow it down while visually inspecting the resulting mask.
-
Morphological Operations: Use morphological operations like erosion and dilation to remove noise and smooth the mask after applying
cv2.inRange.
-
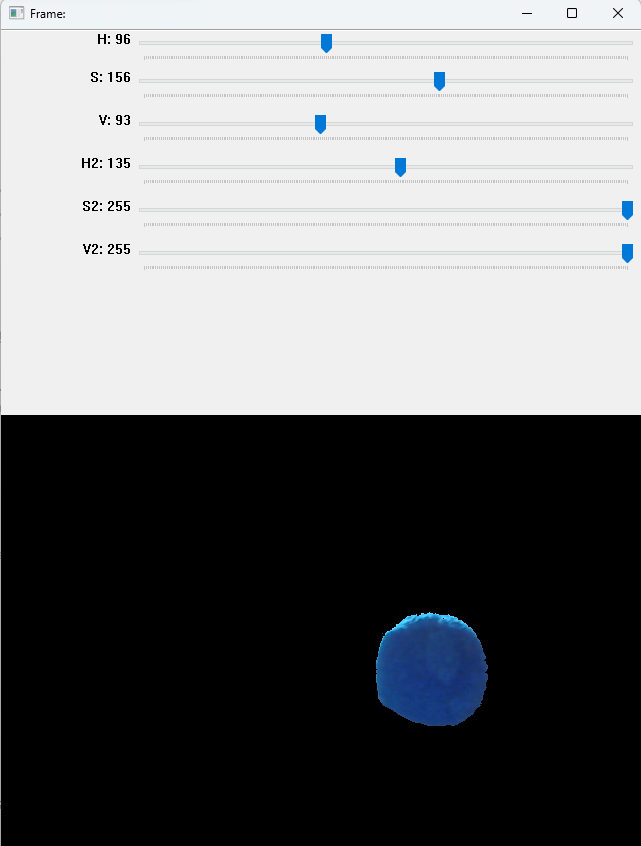
Trackbars: Implement trackbars in your code to dynamically adjust the HSV range and see the results in real-time. This can significantly speed up the fine-tuning process.
Applications:
-
Object Tracking: Detect and track objects of a specific color in videos.
-
Image Segmentation: Segment images based on color to extract regions of interest.
-
Color-Based Image Retrieval: Search for images containing a specific color.
Beyond Red:
-
Other Colors: The same principles apply to detecting any color. Simply adjust the HSV ranges accordingly.
-
Multiple Colors: Detect multiple colors by creating separate masks for each color and combining them using logical operations like
cv2.bitwise_or or cv2.bitwise_and.
This guide outlines a method for isolating specific colors within an image using OpenCV and Python.
1. Color Space Conversion:
- The process leverages the HSV (Hue, Saturation, Value) color space, which offers a more intuitive representation of color compared to RGB.
- Convert your image from RGB to HSV using
cv2.cvtColor(image, cv2.COLOR_BGR2HSV).
2. Defining the Target Color:
- Determine the lower and upper HSV boundaries of your desired color. Online color pickers can be helpful for this step.
- Represent these boundaries as NumPy arrays, e.g.,
lower_red = np.array([0, 100, 100]) and upper_red = np.array([10, 255, 255]).
3. Creating a Mask:
- Utilize the
cv2.inRange() function with your HSV image and defined color boundaries to create a mask. This mask will highlight pixels falling within the specified color range.
4. Fine-tuning and Application:
- Adjust the HSV boundaries to refine the mask's accuracy, expanding the range for more color variations or narrowing it for precision.
- Apply the mask to the original image using
cv2.bitwise_and() to isolate the target color.
5. Handling Hue Wrap-around:
- Colors like red wrap around the hue circle (0-360 degrees).
- To accurately detect such colors, define two separate ranges and combine their respective masks using
cv2.bitwise_or().
By following these steps, you can effectively isolate specific colors within images using OpenCV and Python, enabling various image processing and analysis tasks.
This guide demonstrates how to effectively isolate specific colors within images using OpenCV and Python. By converting to HSV color space, defining appropriate color ranges, creating and fine-tuning masks, and handling hue wrap-around for certain colors, you can achieve accurate color segmentation. This technique has broad applications in various fields, including object tracking, image segmentation, and color-based image retrieval. Understanding these concepts and adapting the code to your specific needs opens up a world of possibilities for image processing and analysis.
-
 Choosing the correct upper and lower HSV boundaries for color ... | A Computer Science portal for geeks. It contains well written, well thought and well explained computer science and programming articles, quizzes and practice/competitive programming/company interview Questions.
-
 python - what are recommended color spaces for detecting orange ... | Jan 30, 2018 ... detect orange. Details from my another answer: Choosing the correct upper and lower HSV boundaries for color detection with
cv::inRange (OpenCV).
-
 How to define the “lower” and “upper” range of a color? - OpenCV ... | Mar 15, 2017 ... how are these arrays are formed? The RGB of red is (255, 0, 0) and its HSV is (0°, 100°, 100°). How's the ...
-
python - How to find the RED color regions using OpenCV? - Stack ... | Jul 8, 2018 ... Related answers: Choosing the correct upper and lower HSV boundaries for color detection with
cv::inRange (OpenCV) · How to define a threshold ...
-
 Lower and Upper Mask Range for Color Detection | by Sardor ... | Most of us have thought many times about color detection🔵🟢🔴. It sounds quite easy task to complete, isn`t it?
-
How can I define a threshold value to detect only green colour ... | Nov 25, 2017 ... Similar: Choosing the correct upper and lower HSV boundaries for color detection with
cv::inRange (OpenCV).
-
How to define "lower" and "upper" range of two (or more) different ... | Jan 5, 2018 ... How can I define "lower" and "upper" range of two different color, such as red and blue (because red and blue are not next to each other in the HSV color)
-
 Finding the required color interval for segmentation - Python - OpenCV | I am trying to get the plant as it is by segmenting everything else in the region, but I am unable to pinpoint the boundaries of the colors forming the plant: It’s a straightforward task that I am using the following code to achieve: import cv2 import numpy as np # specify the path to the video vidcap = cv2.VideoCapture('/home/bla/Desktop/3d_reconst/data/2018/02/22/1/MVI_0590.MOV') # read the first frame success,image = vidcap.read() # so that we know the number of frames count = 0 # do...
-
 Correct HSV InRange Values for 'Red' Objects - OpenCV Q&A Forum | Feb 23, 2014 ... I am using OpenCV 2.4.6 to try to detect white objects in an image that is primarily green-grey. (See the following picture).

