Node.js
Specify Node.js Version in package.json
Learn how to set the minimum and exact required Node.js version for your project using the "engines" field in your package.json file.
Learn how to set the minimum and exact required Node.js version for your project using the "engines" field in your package.json file.

This guide will explain how to specify the required Node.js version for your project within the package.json file. This ensures compatibility and helps avoid unexpected errors. First, open the package.json file located in your project's root directory. Locate the "engines" field or add it if it doesn't exist. Inside this field, add a "node" property and set its value to the desired Node.js version or range using operators like exact version, minimum version, version range, tilde range, or caret range. Save the package.json file. Optionally, enforce the version during installation using tools like nvm or the "engine-strict" flag in your .npmrc file. Remember, specifying and enforcing the Node.js version is crucial for smooth project operation and avoiding compatibility issues. Choose the appropriate version range and consider user needs when deciding on strict enforcement.
Ensuring your project uses the correct Node.js version is crucial for compatibility and avoiding unexpected errors. Here's how to specify the required Node.js version in your package.json file:
1. Open your package.json file:
This file resides in the root directory of your Node.js project and contains metadata about your project, including dependencies, scripts, and version information.
2. Locate or add the "engines" field:
Within the JSON structure of package.json, find the "engines" field. If it doesn't exist, add it at the top level, alongside fields like "name" and "version".
3. Specify the Node.js version:
Inside the "engines" field, add a "node" property and set its value to the desired Node.js version or version range. You can use various operators for specifying the range:
"node": "16.14.0" - This requires exactly version 16.14.0."node": ">=14" - This allows any version 14 or above."node": ">=14.15 <18" - This allows versions 14.15 and above, but below 18."node": "~16.14.0" - This allows versions compatible with 16.14.0, such as 16.14.1 or 16.14.2, but not 16.15.0."node": "^16.14.0" - This allows versions within the 16.x range that maintain API compatibility, such as 16.15.0 or 16.16.0, but not 17.0.0.Example:
{
  "name": "my-awesome-project",
  "version": "1.0.0",
  "engines": {
    "node": ">=14.18"
  },
  // ... other fields
}
4. Save the package.json file.
5. (Optional) Enforce version during installation:
While specifying the engine in package.json informs users about the required Node.js version, it doesn't enforce it during installation. To enforce it, you can:
nvm (Node Version Manager): This allows you to easily switch between different Node.js versions on your system.engine-strict flag in your .npmrc file: This will cause npm install to fail if the current Node.js version doesn't match the specified range. However, this can be inconvenient for users who might have different Node.js versions installed.Remember: Specifying and enforcing the Node.js version helps ensure your project runs smoothly and avoids compatibility issues. Choose the version range that best suits your project's requirements and consider the needs of your users when deciding whether to enforce it strictly.
This JavaScript code snippet demonstrates how to check if the current Node.js version running the script matches the required version specified in the 'package.json' file. It reads the 'engines.node' field from 'package.json' to determine the required version and compares it with the current version obtained through 'process.version'. A basic comparison is performed to check for compatibility, and a message is logged indicating whether the versions match or if there's a potential compatibility issue.
While the package.json file itself is not a JavaScript file, we can demonstrate how to access and utilize the specified Node.js version information within your JavaScript code.
const packageJson = require('./package.json');

const requiredNodeVersion = packageJson.engines.node;

function checkNodeVersion() {
  const currentNodeVersion = process.version;
  console.log(`Required Node.js version: ${requiredNodeVersion}`);
  console.log(`Current Node.js version: ${currentNodeVersion}`);

  // You can implement more sophisticated version comparison logic here
  if (currentNodeVersion.startsWith(requiredNodeVersion)) {
    console.log("Node.js version is compatible!");
  } else {
    console.warn("Warning: Node.js version mismatch! Potential compatibility issues.");
  }
}

checkNodeVersion();
Explanation:
Import package.json: We use require('./package.json') to load the contents of the package.json file as a JavaScript object.
Access Required Version: We access the engines.node property of the packageJson object to retrieve the specified Node.js version or version range.
Get Current Version: We use process.version to get the current Node.js version running the script.
Version Comparison: This example demonstrates a basic comparison by checking if the current version starts with the required version string. You can implement more robust version comparison logic using libraries like semver for more complex version ranges.
Output: The script logs both the required and current Node.js versions and provides a simple compatibility message.
Further Considerations:
semver for complex ranges.package.json. This helps identify potential compatibility issues early on.nvm (Node Version Manager) or n can be invaluable for managing multiple Node.js versions on your system. They allow you to easily switch between versions for development and testing purposes.package.json. This ensures consistency across your development and deployment environments.By carefully considering these factors, you can effectively manage Node.js versions in your projects, ensuring compatibility, stability, and a smooth development experience.
| Step | Action | Description |
|---|---|---|
| 1 | Open package.json
|
This file is located in your project's root directory and contains project metadata. |
| 2 | Locate/Add "engines" field |
Find or add the "engines" field within the JSON structure. |
| 3 | Specify Node.js Version | Inside "engines", add a "node" property and set its value using version operators: * Exact version (e.g., "16.14.0") * Minimum version (e.g., ">=14") * Version range (e.g., ">=14.15 <18") * Tilde range (e.g., "~16.14.0") * Caret range (e.g., "^16.14.0") |
| 4 | Save package.json
|
Save the file after making changes. |
| 5 | (Optional) Enforce Version | Use tools like nvm or set the engine-strict flag in your .npmrc file to enforce the specified version during installation. |
In conclusion, specifying the Node.js version in your package.json file is a simple yet crucial step for ensuring project compatibility and preventing unexpected errors. By following the steps outlined in this guide, you can clearly communicate the required Node.js version to users and collaborators, promoting a smoother development and deployment experience. Remember to consider factors such as dependency compatibility, LTS versions, and testing across different Node.js versions to make informed decisions about version specification. Utilize tools like nvm for managing multiple versions and clearly document your requirements for users. By effectively managing Node.js versions, you can contribute to the stability and success of your projects.
 Configuring your application's dependencies - AWS Elastic Beanstalk | js. Use the engines keyword in the package.json file to specify the Node.js version that you want your application to ...
 How to specify a Node.js version | If a Node.js version is specified compatibility issues can be avoided.
 npm - How to specify/enforce a specific node.js version to use in ... | Feb 9, 2015 ... 5 Answers 5 · Add the engines property to your package.json file. For example: { "name": "example", "version": "1.0.0", "engines": { "node": ">= ...
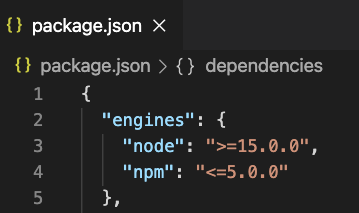 How to define the required Node.js version in package.json ... | A Computer Science portal for geeks. It contains well written, well thought and well explained computer science and programming articles, quizzes and practice/competitive programming/company interview Questions.
 Specify Node Version in package.json - DEV Community | Have you ever downloaded a project that uses javascript and wondered what version of npm or node you...
 package.json | npm Docs | Specifics of npm's package.json handling
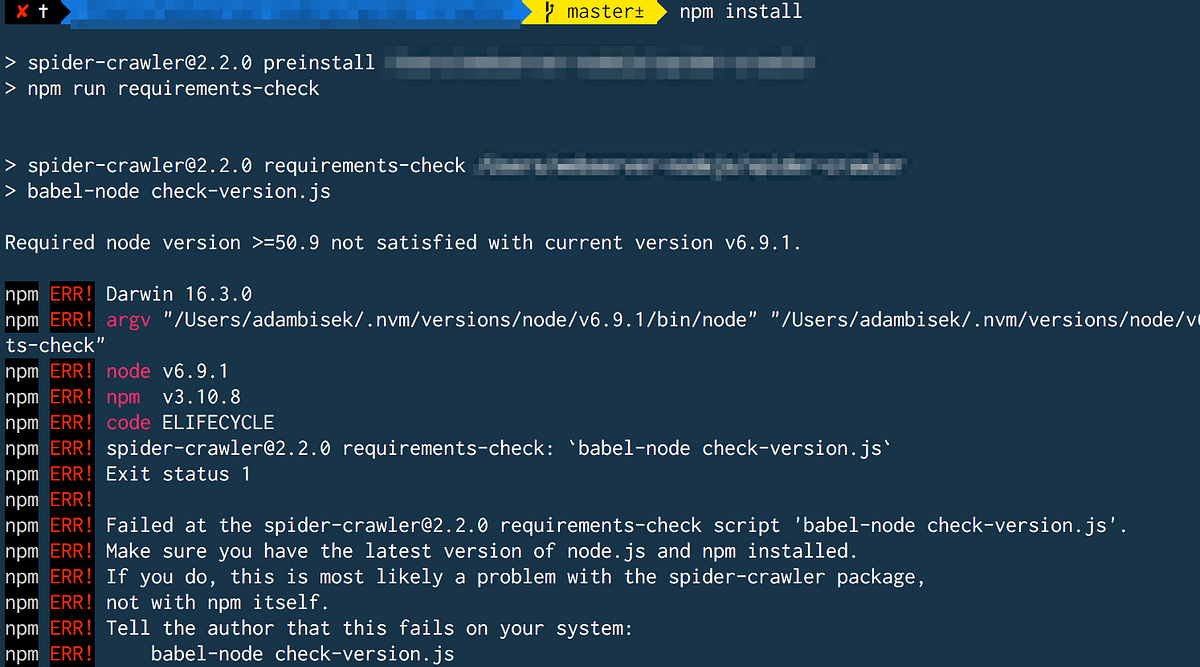 How to check minimum required Node.Js version | by Adam Bisek ... | For many apps may be useful to check the Node.Js engine version and require specific version.
 Heroku Node.js Support | Heroku Dev Center | Apr 10, 2024 ... Specifying a Node.js Version ... specifying a separate npm version isn't necessary. ... npm start , a script that you can specify in package.json .