Machine Vision
OpenCV Python: Draw Rectangle with Text (cv2)
Learn how to use Python's OpenCV library (cv2) to easily draw rectangles with custom text overlays on images and videos.
Learn how to use Python's OpenCV library (cv2) to easily draw rectangles with custom text overlays on images and videos.

This code demonstrates how to use the OpenCV library in Python to draw a rectangle and add text on an image.
import cv2

# Load the image
image = cv2.imread('image.jpg')

# Define the rectangle coordinates
x1, y1 = 100, 50
x2, y2 = 200, 150

# Draw the rectangle on the image
cv2.rectangle(image, (x1, y1), (x2, y2), (0, 255, 0), 2)

# Define the text and its position
text = "Hello, OpenCV!"
text_position = (x1, y2 + 30)

# Put the text on the image
cv2.putText(image, text, text_position, cv2.FONT_HERSHEY_SIMPLEX, 1, (0, 0, 255), 2)

# Display the image
cv2.imshow('Image with Rectangle and Text', image)
cv2.waitKey(0)
cv2.destroyAllWindows()
Explanation:
import cv2
image = cv2.imread('image.jpg')
x1, y1 = 100, 50 and x2, y2 = 200, 150
cv2.rectangle():
cv2.rectangle(image, (x1, y1), (x2, y2), (0, 255, 0), 2)text = "Hello, OpenCV!"text_position = (x1, y2 + 30)cv2.putText():
cv2.putText(image, text, text_position, cv2.FONT_HERSHEY_SIMPLEX, 1, (0, 0, 255), 2)cv2.imshow('Image with Rectangle and Text', image)cv2.waitKey(0) waits for a key press to close the image window.cv2.destroyAllWindows() closes all OpenCV windows.The Python code uses the OpenCV library to load an image, draw a green rectangle on it, add the text "Hello, OpenCV!" below the rectangle in red, and then display the modified image in a window.
import cv2

# Load the image
image = cv2.imread('image.jpg')

# Define the rectangle coordinates
x1, y1 = 100, 50
x2, y2 = 200, 150

# Draw the rectangle on the image
cv2.rectangle(image, (x1, y1), (x2, y2), (0, 255, 0), 2)

# Define the text and its position
text = "Hello, OpenCV!"
text_position = (x1, y2 + 30)

# Put the text on the image
cv2.putText(image, text, text_position, cv2.FONT_HERSHEY_SIMPLEX, 1, (0, 0, 255), 2)

# Display the image
cv2.imshow('Image with Rectangle and Text', image)
cv2.waitKey(0)
cv2.destroyAllWindows()
Explanation:
Import the OpenCV library: import cv2
Load the image: image = cv2.imread('image.jpg')
imread() function. Make sure you replace "image.jpg" with the actual filename of your image.Define the rectangle's coordinates:
x1, y1 = 100, 50: These variables define the x and y coordinates of the top-left corner of the rectangle.x2, y2 = 200, 150: These variables define the x and y coordinates of the bottom-right corner of the rectangle.Draw the rectangle: cv2.rectangle(image, (x1, y1), (x2, y2), (0, 255, 0), 2)
rectangle() function.image: The image on which to draw the rectangle.(x1, y1): Top-left corner coordinates.(x2, y2): Bottom-right corner coordinates.(0, 255, 0): Color of the rectangle in BGR (Blue, Green, Red) format. Here, it's green.2: Thickness of the rectangle's border in pixels.Define the text and position:
text = "Hello, OpenCV!": The text string to be displayed.text_position = (x1, y2 + 30): The position of the text's bottom-left corner. It's placed 30 pixels below the rectangle.Put the text on the image: cv2.putText(image, text, text_position, cv2.FONT_HERSHEY_SIMPLEX, 1, (0, 0, 255), 2)
putText() function.image: The image on which to put the text.text: The text string.text_position: Position of the text.cv2.FONT_HERSHEY_SIMPLEX: Font type.1: Font scale (size).(0, 0, 255): Color of the text in BGR (red in this case).2: Thickness of the text.Display the image:
cv2.imshow('Image with Rectangle and Text', image): This line displays the image in a window titled "Image with Rectangle and Text".cv2.waitKey(0): This line waits indefinitely for a key press. This allows you to see the image until you press any key.cv2.destroyAllWindows(): This line closes all OpenCV windows after you press a key.This code demonstrates how to use OpenCV to draw basic shapes like rectangles and add text to images. You can modify the coordinates, colors, text, and other parameters to customize the output.
cv2.rectangle() will fill the rectangle.cv2.putText() like cv2.FONT_HERSHEY_PLAIN, cv2.FONT_HERSHEY_COMPLEX, etc.if image is None:
print("Error: Could not load image.")
exit()This Python code uses the OpenCV library to:
The code demonstrates basic image manipulation techniques in OpenCV, including drawing shapes and adding text.
This code provides a foundational understanding of how to use OpenCV for basic image manipulation tasks. By modifying the provided code, you can explore drawing other shapes, adding text in different styles, and experimenting with various image processing techniques offered by the OpenCV library.
 Draw Rectangle, Print Text on an image | OpenCV Tutorial | In Python OpenCV Tutorial, Explained How to put text and rectangle over the image using python OpenCV? Draw Rectangle on Image Fill Rectangle on Image Text On Rectangle on Image Text Above Rectangle on Image Save image
 python - How to change the opacity of boxes (cv2.rectangle)? - Stack ... | Jun 6, 2019 ... I draw some rectangles in OpenCV and put text in them. My general approach looks like this: # Draw rectangle p1(x,y) p2(x,y) Student name box ...
 Python OpenCV | cv2.putText() method - GeeksforGeeks | A Computer Science portal for geeks. It contains well written, well thought and well explained computer science and programming articles, quizzes and practice/competitive programming/company interview Questions.
 Drawing Functions - OpenCV | Draws a text string. void, cv::rectangle (InputOutputArray img, Point pt1, Point pt2, const Scalar &color, int thickness=1, int ...
 #002 How to draw lines, rectangles, circles and write text on images ... | May 8, 2020 ... LINE_AA ). # Choosing our font font=cv2.FONT_ITALIC # Writing our text cv2.putText(img,"OpenCV with Python!", (90,250) ...
 Finding blocks of text in an image using Python, OpenCV and numpy | Jan 7, 2015 ... # draw rectangle around contour on original image cv2.rectangle(image,(x,y),(x+w,y+h),(255,0,255),2). # write original image with added ...
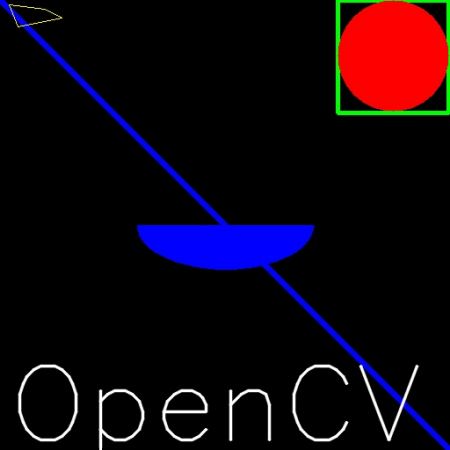 Drawing Functions in OpenCV - OpenCV | Code · Drawing Line · Drawing Rectangle · Drawing Circle · Drawing Ellipse · Drawing Polygon · Adding Text to Images: · Result.
 Transparent overlays with OpenCV - PyImageSearch | This tutorial demonstrates how to use OpenCV to create transparent overlays with the cv2.addWeighted function and OpenCV + Python bindings.