Machine Vision
OpenCV Image Difference Detection and Visualization
Learn how to use OpenCV Python to easily detect and visualize subtle differences between two images for various applications.
Learn how to use OpenCV Python to easily detect and visualize subtle differences between two images for various applications.

This article provides a step-by-step guide on how to detect and highlight differences between two images using OpenCV in Python.
import cv2
import numpy as npimage1 = cv2.imread("image1.jpg")
image2 = cv2.imread("image2.jpg")gray1 = cv2.cvtColor(image1, cv2.COLOR_BGR2GRAY)
gray2 = cv2.cvtColor(image2, cv2.COLOR_BGR2GRAY)diff = cv2.absdiff(gray1, gray2)thresh = cv2.threshold(diff, 0, 255, cv2.THRESH_BINARY | cv2.THRESH_OTSU)[1]cnts = cv2.findContours(thresh.copy(), cv2.RETR_EXTERNAL, cv2.CHAIN_APPROX_SIMPLE)
cnts = cnts[0] if len(cnts) == 2 else cnts[1]for c in cnts:
x, y, w, h = cv2.boundingRect(c)
cv2.rectangle(image1, (x, y), (x + w, y + h), (0, 0, 255), 2)
cv2.rectangle(image2, (x, y), (x + w, y + h), (0, 0, 255), 2)cv2.imshow("Image 1", image1)
cv2.imshow("Image 2", image2)
cv2.waitKey(0)This code will highlight the differences between the two input images by drawing red rectangles around the areas where the pixel values differ significantly. You can adjust the threshold value in step 5 to control the sensitivity of the difference detection.
This Python code compares two images, "image1.jpg" and "image2.jpg", to identify and highlight the differences between them. It converts the images to grayscale, calculates the absolute difference, applies thresholding to create a binary mask of the differences, and then finds contours in the mask. Finally, it draws bounding boxes around the detected differences on both original images and displays them.
import cv2
import numpy as np
# Load the two images
image1 = cv2.imread("image1.jpg")
image2 = cv2.imread("image2.jpg")
# Convert the images to grayscale
gray1 = cv2.cvtColor(image1, cv2.COLOR_BGR2GRAY)
gray2 = cv2.cvtColor(image2, cv2.COLOR_BGR2GRAY)
# Compute the absolute difference between the grayscale images
diff = cv2.absdiff(gray1, gray2)
# Apply thresholding to the difference image
thresh = cv2.threshold(diff, 0, 255, cv2.THRESH_BINARY | cv2.THRESH_OTSU)[1]
# Find contours in the thresholded image
cnts = cv2.findContours(thresh.copy(), cv2.RETR_EXTERNAL, cv2.CHAIN_APPROX_SIMPLE)
cnts = cnts[0] if len(cnts) == 2 else cnts[1]
# Loop over the contours and draw bounding boxes around the differences
for c in cnts:
 x, y, w, h = cv2.boundingRect(c)
 cv2.rectangle(image1, (x, y), (x + w, y + h), (0, 0, 255), 2)
 cv2.rectangle(image2, (x, y), (x + w, y + h), (0, 0, 255), 2)
# Display the images with highlighted differences
cv2.imshow("Image 1", image1)
cv2.imshow("Image 2", image2)
cv2.waitKey(0)Explanation:
cv2.imread(). Replace "image1.jpg" and "image2.jpg" with the actual file names of your images.cv2.cvtColor(). This is done because color information is not necessary for difference detection and grayscale images are simpler to process.cv2.absdiff() calculates the absolute difference between each corresponding pixel in the two grayscale images.cv2.threshold(). This creates a binary mask where pixels with a difference greater than the threshold are set to white (255) and others to black (0). Otsu's thresholding method is used to automatically determine the optimal threshold value.cv2.findContours() finds the contours (outlines) of the white regions in the thresholded image. These contours represent the areas where the two images differ.cv2.rectangle(). This highlights the differences visually.cv2.imshow(). cv2.waitKey(0) waits for a key press to close the image windows.This code provides a basic framework for image difference detection. You can further customize it by adjusting the threshold value, changing the color of the bounding boxes, or adding more sophisticated image processing techniques.
Code Robustness:
cv2.contourArea(c) and discarding those below a certain threshold.Performance:
Alternative Approaches:
Applications:
Further Exploration:
This Python code snippet demonstrates how to detect and highlight differences between two images using OpenCV.
Here's a breakdown of the process:
Key Points:
This code effectively highlights differences between two images, making it useful for applications like quality control, surveillance, and medical imaging. Understanding thresholding and contour detection in OpenCV is key to leveraging this technique. Remember to consider image size, filter out insignificant contours, and explore alternative approaches like SSIM or feature-based comparison for potentially more robust results. For further exploration, consult the OpenCV documentation and image processing tutorials.
 opencv - CV - Extract differences between two images - Stack Overflow | Nov 20, 2014 ... well, the question here was not to build the background model, but to find the "differences" better (which is hard in grayscale images). @ ...
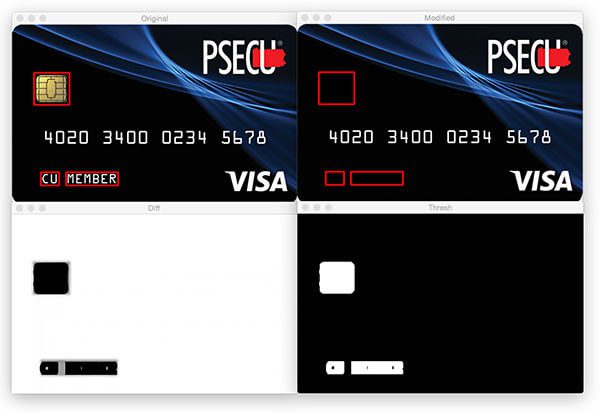 Image Difference with OpenCV and Python - PyImageSearch | Learn how to compare two images by computing image differences and highlighting the differences between the images using OpenCV and Python.
 Visualize differences between two images - OpenCV Q&A Forum | May 17, 2019 ... My current approach to make the differences obvious, is to create a mask (difference between the two images), color it red, and then add it to the images.
 Spot the difference between two images using Python ... | A Computer Science portal for geeks. It contains well written, well thought and well explained computer science and programming articles, quizzes and practice/competitive programming/company interview Questions.
 Is it possible to compare 2 video files frame by frame? - VideoHelp ... | Jan 28, 2023 ... ... python and using modules skimage, opencv and plotlib to have visual graph output: ... I doubt you'll be able to reliably automatically detect such ...
 Detecting image differences using Python and OpenCV | Abnormal ... | Jul 7, 2019 ... This document shows how to detect differences between two images using Python and OpenCV. Python packages. from skimage.measure import ...
 Keypoint detection: drawMatches on multiple images / confusion ... | I’m using opencv-python, and I am trying to visualize results from AKAZE keypoint matching for multiple images. While playing around with drawMatches, several questions arose. Below is the code, and my questions: import cv2 template_image cv2.imread("img1.tif") target_image cv2.imread("img2.tif") akaze = cv2.AKAZE_create() kp1, des1 = akaze.detectAndCompute(template_image, None) kp2, des2 = akaze.detectAndCompute(target_image, None) matcher = cv2.DescriptorMatcher_create(cv2.DescriptorMatcher...