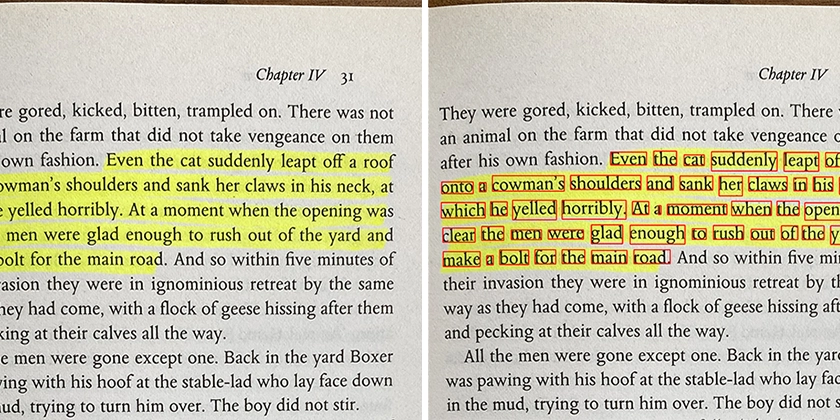
OpenCV Python: Extract All Bounding Boxes
Learn how to utilize OpenCV's Python library for efficiently extracting multiple bounding boxes from images, covering object detection and localization.
Learn how to utilize OpenCV's Python library for efficiently extracting multiple bounding boxes from images, covering object detection and localization.
This code snippet demonstrates a common task in computer vision: extracting regions of interest (ROIs) from an image using contours. We'll use OpenCV's powerful functions to find contours, define bounding boxes, and extract these ROIs for further processing or analysis.
Find contours in the image:
contours, _ = cv2.findContours(image, cv2.RETR_EXTERNAL, cv2.CHAIN_APPROX_SIMPLE)Loop through the contours and extract bounding box coordinates:
for contour in contours:
    x, y, w, h = cv2.boundingRect(contour)
Extract the region of interest (ROI) using Numpy slicing:
roi = image[y:y+h, x:x+w](Optional) Save the ROI as a new image:
cv2.imwrite("roi.jpg", roi)Explanation:
cv2.findContours() finds these contours.cv2.boundingRect() calculates the bounding box coordinates (x, y, width, height) for each contour.cv2.imwrite() saves the extracted ROI as a separate image.The Python code using OpenCV library detects objects in an image and extracts each object into a separate image file. It first loads the image, converts it to grayscale, and finds contours which represent the boundaries of objects. For each contour, it calculates a bounding box and extracts the corresponding region from the original image. Finally, it saves each extracted region as a separate image file.
import cv2

# Load the image
image = cv2.imread("input.jpg")

# Convert the image to grayscale
gray = cv2.cvtColor(image, cv2.COLOR_BGR2GRAY)

# Find contours in the image
contours, _ = cv2.findContours(gray, cv2.RETR_EXTERNAL, cv2.CHAIN_APPROX_SIMPLE)

# Loop through the contours
for i, contour in enumerate(contours):
    # Get bounding box coordinates
    x, y, w, h = cv2.boundingRect(contour)

    # Extract the ROI using Numpy slicing
    roi = image[y:y+h, x:x+w]

    # Save the ROI as a new image
    cv2.imwrite(f"roi_{i}.jpg", roi)
Explanation:
Import necessary library:
import cv2 imports the OpenCV library.Load the image:
image = cv2.imread("input.jpg") loads the image named "input.jpg". Replace "input.jpg" with the actual filename of your image.Convert to grayscale (optional but recommended):
gray = cv2.cvtColor(image, cv2.COLOR_BGR2GRAY) converts the image to grayscale. This is often helpful for contour detection.Find contours:
contours, _ = cv2.findContours(gray, cv2.RETR_EXTERNAL, cv2.CHAIN_APPROX_SIMPLE) finds contours in the grayscale image.
cv2.RETR_EXTERNAL retrieves only the outermost contours.cv2.CHAIN_APPROX_SIMPLE compresses the contour representation for efficiency.Loop through contours:
Get bounding box:
x, y, w, h = cv2.boundingRect(contour) calculates the bounding box coordinates for the current contour.Extract ROI:
roi = image[y:y+h, x:x+w] extracts the region of interest (ROI) from the original image using the bounding box coordinates and Numpy slicing.Save ROI:
cv2.imwrite(f"roi_{i}.jpg", roi) saves each extracted ROI as a separate image file named "roi_0.jpg", "roi_1.jpg", etc.To use this code:
pip install opencv-python).Contour Finding:
cv2.findContours() function can also return contour hierarchy information, which describes the relationships between contours (e.g., which contours are nested inside others). This can be useful for more complex image analysis tasks.Bounding Box and ROI Extraction:
cv2.boundingRect() provides an upright bounding box, you can use cv2.minAreaRect() to get a rotated bounding box (which might be a tighter fit for some objects) or cv2.convexHull() to get a convex hull around the contour.Code Enhancements:
cv2.drawContours() and cv2.rectangle().Applications:
This code snippet has various practical applications, including:
This code snippet demonstrates how to extract specific objects from an image using contours and bounding boxes in OpenCV:
| Step | Description | Code |
|---|---|---|
| 1. Find Contours | Identify the boundaries of objects in the image. | contours, _ = cv2.findContours(image, cv2.RETR_EXTERNAL, cv2.CHAIN_APPROX_SIMPLE) |
| 2. Get Bounding Boxes | Calculate the rectangular coordinates enclosing each contour. | for contour in contours: x, y, w, h = cv2.boundingRect(contour) |
| 3. Extract ROI | Use the bounding box coordinates to extract the object from the original image. | roi = image[y:y+h, x:x+w] |
| 4. Save ROI (Optional) | Save the extracted object as a separate image file. | cv2.imwrite("roi.jpg", roi) |
Key Concepts:
This technique is useful for isolating and processing individual objects within an image, enabling tasks like object recognition, tracking, and analysis.
This article explained how to extract regions of interest (ROIs) from images using contours in Python with the OpenCV library. By finding contours, which represent the boundaries of objects, we can define bounding boxes and subsequently extract these ROIs. This technique is fundamental for various computer vision tasks, including object detection, image segmentation, and optical character recognition. The provided code snippet offers a practical starting point for implementing ROI extraction, and with further exploration of OpenCV's functionalities, you can adapt and enhance it for your specific applications.
 Building an object detector in TensorFlow using bounding-box ... | Object detection is both classifying and locating objects inside an image. In other words, it is a combination of image classification and…
 multiple contour bounding box - OpenCV Q&A Forum | Apr 7, 2015 ... Hi all. I am detecting contours in an image, and need to draw a bounding box around them all. Right now i have a cluster of contours, ...
 Extract Highlighted Text from a Book using Python - DEV Community | I'm old fashioned when it comes to reading. Even though I prefer the digital equivalent in almost...