Kubernetes
List Kubernetes Node Taints: A Quick Guide
Learn how to effectively list and inspect taints on your Kubernetes nodes to control pod scheduling and ensure cluster stability.
Learn how to effectively list and inspect taints on your Kubernetes nodes to control pod scheduling and ensure cluster stability.

To list taints on Kubernetes nodes, you can use the kubectl describe node command and look for the Taints section. For a more concise output, use kubectl get nodes with the -o custom-columns option. This command will display a table with node names and their corresponding taints. If a node has no taints, the Taints column will be empty for that node. Remember that Kubernetes taints are used to repel pods from specific nodes. They work in conjunction with tolerations, which are applied to pods to allow them to be scheduled on tainted nodes.
To list taints on Kubernetes nodes, you can use the kubectl describe node command and look for the Taints section.
kubectl describe node <node-name>For a more concise output, use kubectl get nodes with the -o custom-columns option:
kubectl get nodes -o custom-columns=NAME:.metadata.name,TAINTS:.spec.taintsThis command will display a table with node names and their corresponding taints. If a node has no taints, the Taints column will be empty for that node.
Remember that Kubernetes taints are used to repel pods from specific nodes. They work in conjunction with tolerations, which are applied to pods to allow them to be scheduled on tainted nodes.
This code provides two ways to list taints on Kubernetes nodes using kubectl. The first method uses kubectl describe node to display detailed node information, including taints. The second method uses kubectl get nodes with custom columns to show a table of node names and their corresponding taints. Examples demonstrate how to interpret the output and understand the effect of taints on pod scheduling.
1. Using kubectl describe node:
kubectl describe node <node-name>Replace <node-name> with the actual name of the node you want to inspect. For example:
kubectl describe node node-1This command will output detailed information about the node, including its taints in the "Taints" section.
Example Output:
Name:               node-1
(...)
Taints:              node.kubernetes.io/unreachable:NoSchedule
(...)
2. Using kubectl get nodes with custom columns:
kubectl get nodes -o custom-columns=NAME:.metadata.name,TAINTS:.spec.taintsThis command will output a table with two columns: "NAME" (node name) and "TAINTS" (list of taints).
Example Output:
NAME       TAINTS
node-1     node.kubernetes.io/unreachable:NoSchedule
node-2     <none>
node-3     key1=value1:NoExecute,key2=value2:PreferNoSchedule
Explanation:
<none>.These examples demonstrate how to easily list taints on your Kubernetes nodes using different kubectl commands. You can use this information to understand which nodes have restrictions on pod scheduling and adjust your deployments accordingly.
Purpose: Taints are essentially "anti-affinity" signals. While node affinity attracts pods to specific nodes, taints repel pods from nodes that have them. This is useful for:
Taint Effects:
NoSchedule: Pods without a matching toleration cannot be scheduled on the tainted node.PreferNoSchedule: The scheduler tries to avoid placing pods without a matching toleration on the node, but it's not a strict restriction.NoExecute: Pods without a matching toleration are evicted if the taint is added to a node where they are already running.Taint Keys and Values: These provide flexibility in defining taint rules. You can use meaningful names relevant to your environment.
Taints and Tolerations Work Together: Taints alone don't enforce anything. Pods need corresponding tolerations to be allowed on tainted nodes. Tolerations are defined at the pod level and must match the taint's key, effect, and optionally the value.
Troubleshooting: If pods aren't being scheduled as expected, check for taints on nodes and ensure your pods have the necessary tolerations. The kubectl describe pod <pod-name> command can help identify scheduling issues.
Best Practices:
This document summarizes how to list taints applied to nodes in a Kubernetes cluster.
| Method | Command | Description
Understanding how to list and interpret taints on Kubernetes nodes is crucial for managing pod scheduling and ensuring your applications run on the appropriate resources. By using the kubectl describe node and kubectl get nodes commands with the options described, you can gain visibility into taint configurations and troubleshoot potential scheduling conflicts. Remember that taints are just one part of Kubernetes's flexible scheduling mechanisms. Combining taints with tolerations, labels, and other selectors gives you fine-grained control over where your pods land and how your cluster resources are utilized.
 How to extract the list of nodes which are tainted - Discuss Kubernetes | Asking for help? Comment out what you need so we can get more information to help you! Cluster information: Kubernetes version:1.15 Cloud being used: (put bare-metal if not on a public cloud) Installation method: kubeadm Host OS: linux CNI and version: CRI and version: How to extract the list of nodes which are tainted. Unable to find node name when using jsonpath as “effect:NoSchedule” or viceversa in the Kubernetes command line
 How to Set, List, and Remove Taints on Kubernetes Nodes ... | Learn how to manage taints for Kubernetes nodes, including how to set, list, and remove them.
 Taints and Tolerations | Kubernetes | Node affinity is a property of Pods that attracts them to a set of nodes (either as a preference or a hard requirement). Taints are the opposite -- they allow a node to repel a set of pods.
Tolerations are applied to pods. Tolerations allow the scheduler to schedule pods with matching taints. Tolerations allow scheduling but don't guarantee scheduling: the scheduler also evaluates other parameters as part of its function.
Taints and Tolerations | Kubernetes | Node affinity is a property of Pods that attracts them to a set of nodes (either as a preference or a hard requirement). Taints are the opposite -- they allow a node to repel a set of pods.
Tolerations are applied to pods. Tolerations allow the scheduler to schedule pods with matching taints. Tolerations allow scheduling but don't guarantee scheduling: the scheduler also evaluates other parameters as part of its function. kubernetes - How do I find out what caused a taint on one of my k8s ... | Nov 24, 2023 ... 2 Answers 2 · 1.Get a list of all nodes in your cluster by running the following command: kubectl get nodes · 2.Inspect a node by running the ... kubectl taint | Kubernetes | Synopsis Update the taints on one or more nodes.
A taint consists of a key, value, and effect. As an argument here, it is expressed as key=value:effect. The key must begin with a letter or number, and may contain letters, numbers, hyphens, dots, and underscores, up to 253 characters. Optionally, the key can begin with a DNS subdomain prefix and a single '/', like example.com/my-app. The value is optional. If given, it must begin with a letter or number, and may contain letters, numbers, hyphens, dots, and underscores, up to 63 characters. Well-Known Labels, Annotations and Taints | Kubernetes | Kubernetes reserves all labels, annotations and taints in the kubernetes.io and k8s.io namespaces.
This document serves both as a reference to the values and as a coordination point for assigning values.
Labels, annotations and taints used on API objects apf.kubernetes.io/autoupdate-spec Type: Annotation
Example: apf.kubernetes.io/autoupdate-spec: "true"
Used on: FlowSchema and PriorityLevelConfiguration Objects
If this annotation is set to true on a FlowSchema or PriorityLevelConfiguration, the spec for that object is managed by the kube-apiserver.
kubernetes - How do I find out what caused a taint on one of my k8s ... | Nov 24, 2023 ... 2 Answers 2 · 1.Get a list of all nodes in your cluster by running the following command: kubectl get nodes · 2.Inspect a node by running the ... kubectl taint | Kubernetes | Synopsis Update the taints on one or more nodes.
A taint consists of a key, value, and effect. As an argument here, it is expressed as key=value:effect. The key must begin with a letter or number, and may contain letters, numbers, hyphens, dots, and underscores, up to 253 characters. Optionally, the key can begin with a DNS subdomain prefix and a single '/', like example.com/my-app. The value is optional. If given, it must begin with a letter or number, and may contain letters, numbers, hyphens, dots, and underscores, up to 63 characters. Well-Known Labels, Annotations and Taints | Kubernetes | Kubernetes reserves all labels, annotations and taints in the kubernetes.io and k8s.io namespaces.
This document serves both as a reference to the values and as a coordination point for assigning values.
Labels, annotations and taints used on API objects apf.kubernetes.io/autoupdate-spec Type: Annotation
Example: apf.kubernetes.io/autoupdate-spec: "true"
Used on: FlowSchema and PriorityLevelConfiguration Objects
If this annotation is set to true on a FlowSchema or PriorityLevelConfiguration, the spec for that object is managed by the kube-apiserver.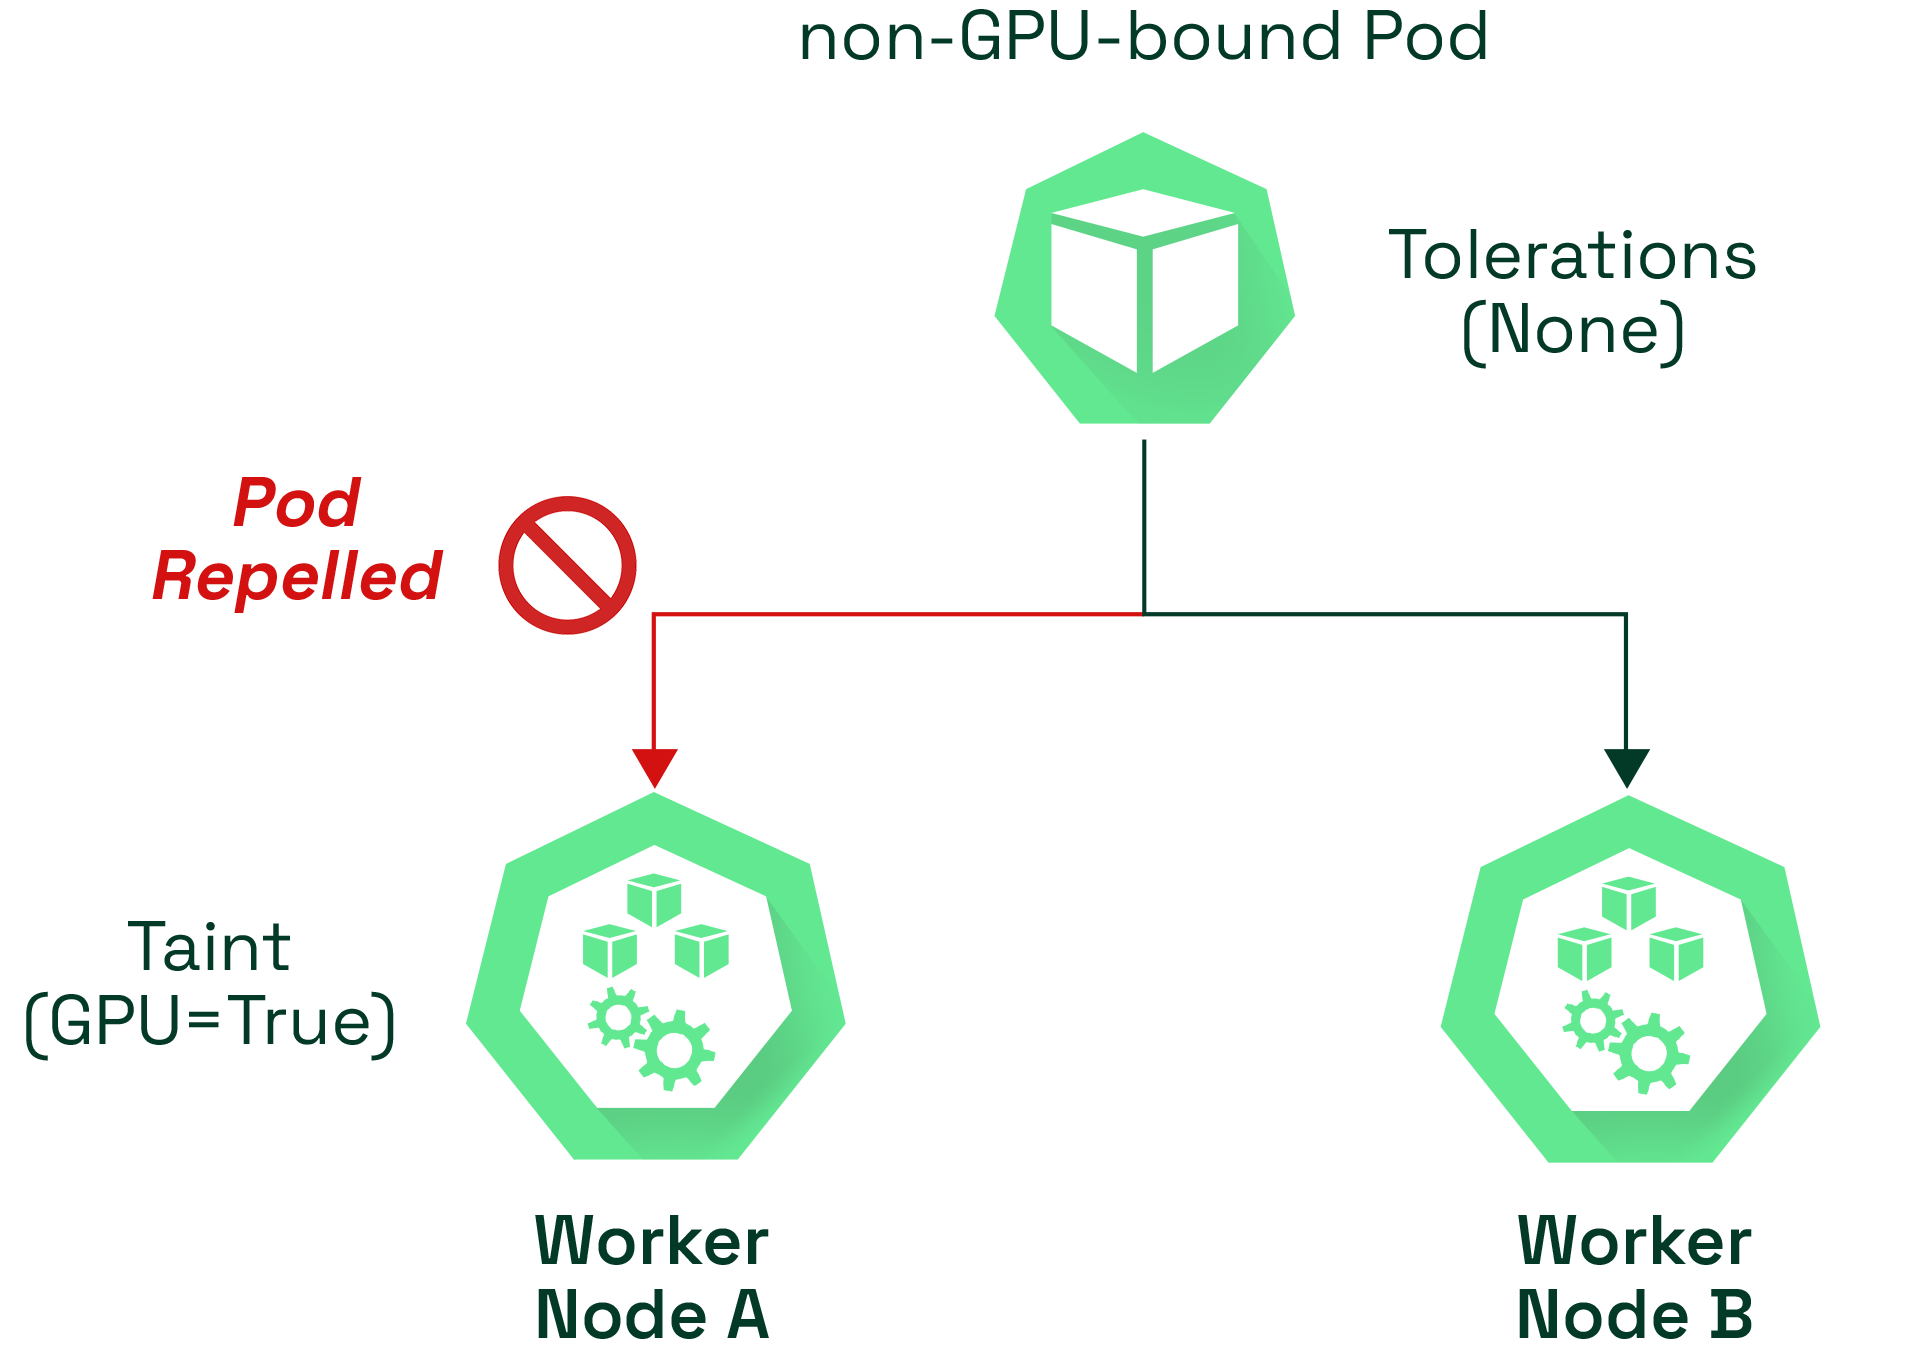 Kubernetes Taints & Tolerations: Tutorial With Examples - Kubecost ... | Learn the advanced Kubernetes pod scheduling of using taints and tolerations, compare it to other approaches, and follow a step-by-step example. Nodes | Kubernetes | Kubernetes runs your workload by placing containers into Pods to run on Nodes. A node may be a virtual or physical machine, depending on the cluster. Each node is managed by the control plane and contains the services necessary to run Pods.
Typically you have several nodes in a cluster; in a learning or resource-limited environment, you might have only one node.
The components on a node include the kubelet, a container runtime, and the kube-proxy.
Kubernetes Taints & Tolerations: Tutorial With Examples - Kubecost ... | Learn the advanced Kubernetes pod scheduling of using taints and tolerations, compare it to other approaches, and follow a step-by-step example. Nodes | Kubernetes | Kubernetes runs your workload by placing containers into Pods to run on Nodes. A node may be a virtual or physical machine, depending on the cluster. Each node is managed by the control plane and contains the services necessary to run Pods.
Typically you have several nodes in a cluster; in a learning or resource-limited environment, you might have only one node.
The components on a node include the kubelet, a container runtime, and the kube-proxy.